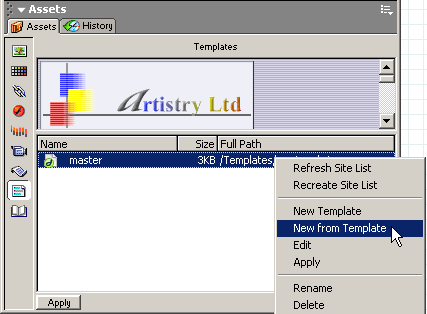
Q. Why would I want to use a nested template? A. The nested template gives you the ability to maintain global control over your site while providing the option to alter specific content on specific pages. Nested templates- Part TwoAuthor: jojo Creating the nested template.OK, now we want to create our nested template. Lets use the shortcut F11 to open our assets panel, the image below is my set up and yours will no doubt vary; but you will be in the correct place by using the shortcut. Should your site contain more than one template they will of course all show in the Assets Panel, selecting each one individually will load it into the upper preview pane of the Assets Panel. Select the "Templates" icon and you will see your template shown in the upper window and listed in the lower window. Right click on the template listing in the lower window and select "New from Template". This will open a new instance of the template in design view.
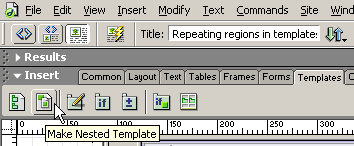
We can now select the "Templates" tab on the Insert Panel and click the "Make Nested Template" icon.
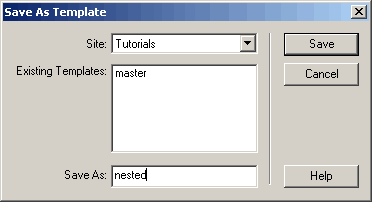
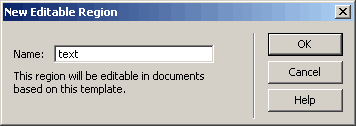
This will produce the dialog box shown below, give it a name of "nested" and click Save.
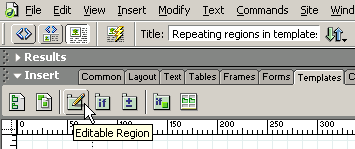
With our newly created "nested" template saved we can now add further editable regions within our existing editable regions, lets click inside the table cell that contains the Latin text filler and select the <td> tag on the status bar. Click the "Templates" tab and select the "Editable Region" icon to add a new editable region called text into the nested template.
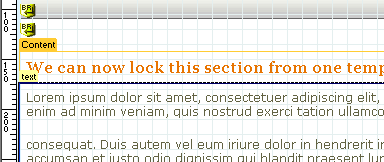
At this point the "Content" editable region should turn orange (if your using default colours) as below. This indicates it will not be editable in a child page from the "nested" template. Pages produced from the "master" template of course retain their permission to edit the information in the content area as well as the text area. We can now save our work and close our nested template.
Lets use the keyboard shortcut F11 again to open our Assets Panel. Select the "nested" template by right clicking on it and selecting the option of "New from Template" to create a new instance of the nested template. When the template instance opens in design view you will notice that the editable region we called "Content" in the master template is not visible in the template instance from the "nested" template and therefore not editable from within our nested template.
|
||
| « Previous | 1 | 2 |
||
::This page last modified 8/13/2013 at 04:37::
 |
Copyright
© 2001-2026 DreamweaverFAQ.com All Rights Reserved. All brands, trademarks, tutorials, extensions, code, and articles are the property of their respective owners. A production of Site Drive Inc. Legal Notice | Privacy Policy | Disclaimer & Notice
|
 |
