|
Q. How do I get a colored border around my table, but not each cell, that works across browsers? A. To simulate a colored border around your table with cross-browser compatibility, you must insert a table within another table. This process is known as Nesting Tables. The Thin Table Border helps you easily create this effect. The Thin Table Border Extension v~1.2.0Extension Developer: George
Mclachlan About the Extension
"Ah but," I hear you say, "you can use CSS to define your table borders". True, however what most developer/designer look for is way of building their page which will display correctly cross browser. So how is it done? One of the great things about Dreamweaver is it's extensibility. Note: This extension only works in DW4 however there is a version for DW3 although the Interface is slightly different The DownloadsThin Table Border Extension v~1.2.0 Before we run through how to use this extension let's make sure you have downloaded it. Get the extension for Dreamweaver 4/Ultradev 4 here. Get the extension for Dreamweaver 3 here. This extension can also be downloaded from the Macromedia
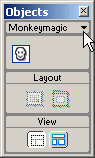
Exchange. The InterfaceOk you have now downloaded and installed the extension, so how
do you get to it. You will see this icon All you have to do is click on the section of the page you wish to place the table move the mouse back to the Objects Panel and click the icon. Because this extension simply inserts 2 tables it's interface is only slightly different form the standard DW table interface. Let's take a look at it.
Width: This is the same as the DW table interface enter an value and select either percent or pixels. Border Color: This sets the background color of the outer table. You can either use the color picker or type in the hex value manually. Inner Table Columns and Rows:Again these are the same as the standard DW table interface and the extension will apply these values to the inner table. Inner Table Color: This sets the background color of your nested table The Example(s)If we used the values from the screenshot above it would produce this code: <table width="400" cellspacing="0" bgcolor="#000000"> Which would give you the following table:
Tip: The extension will save the values you last entered. This will save some time if you need to place more than one table with the same attributes on a page. To bypass the interface, press Ctrl (Windows) or Command (Macintosh) and click the icon. |
|||||||||
 Anyone
who has spent any length of time in the DW newsgroup will have heard
this question asked before. The basic answer is that using the normal
table border attributes you can't !
Anyone
who has spent any length of time in the DW newsgroup will have heard
this question asked before. The basic answer is that using the normal
table border attributes you can't !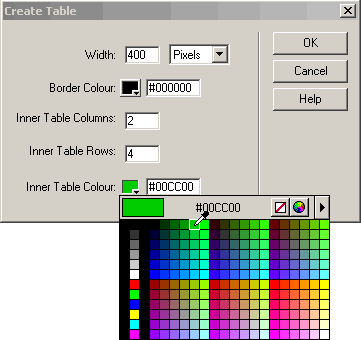
::This page last modified 8/13/2013 at 04:37::
 |
Copyright
© 2001-2026 DreamweaverFAQ.com All Rights Reserved. All brands, trademarks, tutorials, extensions, code, and articles are the property of their respective owners. A production of Site Drive Inc. Legal Notice | Privacy Policy | Disclaimer & Notice
|
 |