|
Q. How do I create a thin line that expands with my
text?
A. To create a vertical or a horizontal rule (using tables), use a 1x1 transparent GIF in a cell with a colored
background, then force the table to collapse on itself by setting the adjacent table cell to 100%.
Creating Rules with Tables
Author: Jay Grantham
Author's Site: WebsiteIC
Know What You Want
Although the question posed is, "How do I create a thin line that expands with my text?" it is quite possible to use rules in other ways. For instance, the lines found on both sides of this tutorial are vertical rules. Following this tutorial I have placed a few other examples of rules.
 Obtain a "Spacer" Obtain a "Spacer"
If you don't already have a spacer, I'll give you this one as a gift.

To download the transparent spacer.gif, (PC) right-click then choose "Save Picture As", or (Mac) Control+Click then select "Save As". You can save this file as anything you like, but shim.gif
or spacer.gif are often used simply because Macromedia has used
those names when transparent GIF files are automatically created
within their products.
Note: If I would have placed a plain 1x1 spacer gif, you never would have been able to find it to save it (well, it would have been tough). What I did was give it a width and height of "20" and a border of "1" so that you could find it, rest assured that it is actually a 1x1 gif.
Pick a Place
First time up, you should try this in a new document. Create a
new file and save it in the location of your choice. Once you get
the idea down, you can place the text with vertical rule just about
anywhere your heart desires.
Create a Table
To get started lets keep it simple and create a 1 row, 2 column
table using one of the following methods:
- Insert» Table
- Objects Panel» Insert Table
- (PC) Ctrl+Alt+T
- (Mac) Command+Option+T
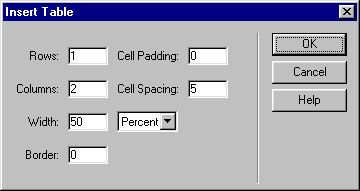
Make your selections as follows:

Tip: The Cell Spacing will create the
distance between the rule and the content. To have absolute power
over the width of the rule, it is important to have Cell
Padding set to "0". It is also important to make
sure your </td> tags are located directly after the content
in each cell.
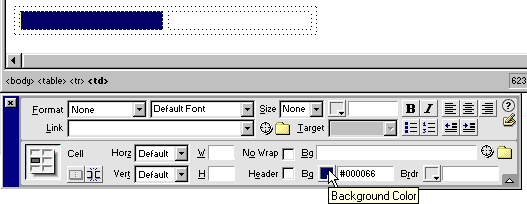
You should see:

Insert your cursor in the left cell (to create a left vertical
rule). Once you have decided on a color for your rule, change the
cell background using the Property Inspector.

Insert an Image
With your cursor in the same (colored) cell, insert an image using one of the following methods:
- Insert» Image
- Objects Panel» Insert Image
- (PC) Ctrl+Alt+I
- (Mac) Command+Option+I
The image you insert should be your spacer
image (1 x 1 transparent GIF)
Apply Cell Width
You need to define the width of the right hand cell (for a left
hand rule). Place your cursor in the right hand cell and in the
Property Inspector make the width 100%.

I've also set the Horizontal cell attributes to Left and Vertical to Top.
Insert Copy
Now all you have to do is place the Copy (words) in the right hand
cell. As your words increase, so will your vertical rule.
If for some reason your rule is not as thin as you would like it to be, make sure your transparent GIF has a width and height set to "1". Also, make sure your </td> tags are on the same line as the cell content, and do not have any spaces preceding them.

|


