Working With DataShapingAuthor: Daniel
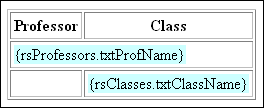
W. Short IntroductionOne of the most difficult parts of designing a site based on relational data, is getting all the data to make sense on a webpage. If you have multiple child records for each parent record, for example multiple chapters (child records) for each book (parent record), then you have to build multiple recordsets, build nested repeat regions and manually code If...Then...Else statements to check for record changes. To get around all of this mess you can use a function of Microsoft's ADO Components. The MSDataShape driver takes care of all of the record relationship management. Even after playing with DataShaping for a bit, those opening sentences even confuse me. So in order to make it clear exactly what's going on I'm going to jump right into a real life example. After all is said and done, we're going to build something like this:
What are the ingredients?
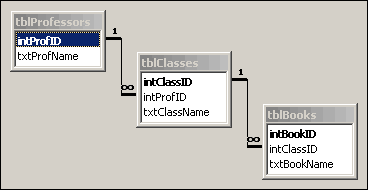
Building the database tables Our example is for a school book list, based on professor and classes that each professor teaches (I got the idea from a 4GuysFromRolla article). We'll first build our Class list by Professor, and then for the more adventurous, we'll add the books. So in order to do this, we obviously need a database to do some shaping. Here are the three tables we're going to use in our database:
Now that we've got all our tables, here's a graphical representation of how they're all related. This is done in Microsoft Access by clicking Tools > Relationships, and dragging and dropping the related fields on top of each other.
In order to do all our datashaping, we obviously need some data in those tables. Here's the content for each table:
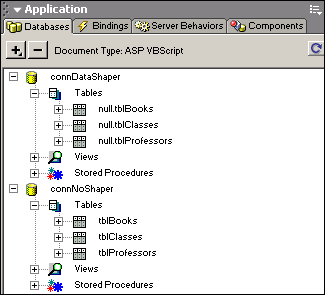
Building a database connection To work with datashaping, I recommend using two different and distinct connections. The reason for this, is that Dreamweaver can't handle the custom provider we need to do the datashaping. To do this, follow these steps:
Note: If you're using a DSN connection, you may be able to simply add a Provider declaration to your recordset code. In the Code View, simply add the Provider declaration before the Open statement. rsProfessors.LockType = 1 You should now have two separate connections in your Databases Panel. If you expand your connections in the Databases panel, you'll notice that the tables in "connDataShaper" are prefixed with "null.", since Dreamweaver doesn't know how to handle them. These tables can't be used by Dreamweaver to drop data on the page. The "connNoShaper" connection will be used to build some plain "non-shaped" recordsets to use in our Bindings Panel.
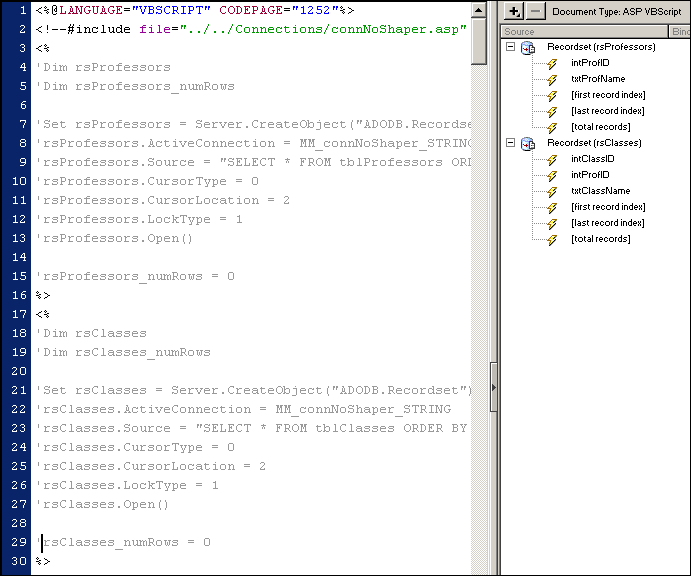
Building our working recordsets The one disadvantage to working with DataShaping is the inability of Dreamweaver to handle them in a visual manner. To get over that we can build some regular recordsets and then simply comment out the server side code in the Code View. Even though the recordsets are commented out in the actual code, you'll still be able to use the bindings panel to work with the data. For our first example (without the books) we're going to need two different recordsets, rsProfessors and rsClasses. To create our recordsets, follow these steps:
You should now have two recordsets in your Bindings Panel. Switch to Code View, View > Code or Ctrl+`, and scroll to the top of the page. Comment out all of the recordset code by putting an apostrophe at the beginning of each line (thanks to the guys at T-Cubed for the tip). This allows you to use the Bindings Panel using the recordsets without actually executing the code on your live page. You should now see something similar to this:
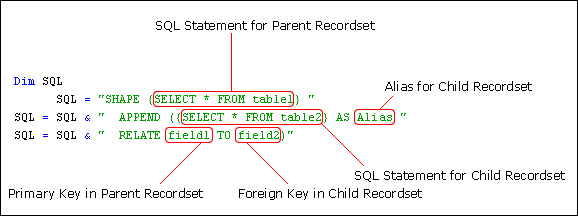
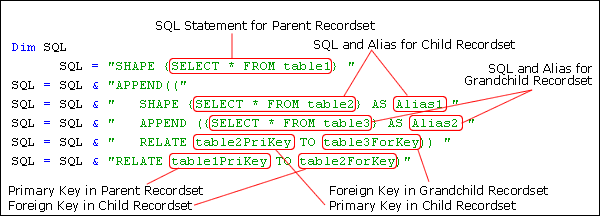
Shape dat Data Now we need to build the actual DataShaping piece of the puzzle. To do this, we're going to do a little handcoding directly below the recordsets we just commented out. The first thing we need to do is add an include to our DataShape connection. While still in Code View, place your cursor on Line 31, and choose Insert > Script Objects > Server Side Include and browse to "Connections/connDataShaper.asp". That will place this include on Line 31: <!--#include file="../../Connections/connDataShaper.asp" --> On Line 32, we're going to use our DataShape Recordset Snippet. Install the Snippet and then place your cursor on Line 32, open the Snippets Panel, Window > Snippets or Shift+F9, and insert the DataShape Recordset snippets from the DataShaping category. Lines 32-41 should now contain this code: <% Dim SQL Here's an explanation of each of the pieces of the SQL statement:
The Snippet is set up so you can just copy/paste in the necessary pieces. The SQL lines define our DataShape statement. The syntax is fairly self explanatory.
Our finished code block should like this: <% We can now create the base table for our DataShaping. We just need 2 columns and three rows. We just need to put the Professor's name in the first row and merge the two columns, and the class name in the second row. When you're done, the page should look like this:
Now switch to code view, and wrap the Parent Recordset Repeat snippet around both the Professor name table row and the Class name table row. Your finished code should look like this: <% Now make all of the same replacements you made when you first added the DataShape SQL to the page. Except this time, we need to replace "rs1" with rsProfessors, our parent recordset and "rs2" with "rsClasses", which is our child recordset. We also need to replace "Alias" with the Alias we defined in our APPEND statement in the DataShape SQL. This tells the ADO component which records from the Child Recordset to display. After making all those changes your code should look like this: <% Now wrap the Class name row with the Child Recordset Repeat snippet and once again replace "rs2" with "rsClasses". This is our completed code: <% If Dreamweaver could handle applying nested repeat regions (whether it really supported them or not) then we could use the standard Repeat Region Server Behaviors, instead of applying the While statements manually. However, Dreamweaver checks to see if you're applying the repeat inside another repeat, which generates an error. Check out the completed example. A Gourmet TreatWe've now completed a Parent/Child DataShape, which builds our nested repeat regions with just a few lines of code. Now I know I've whet your appetite for more. So our Gourmet Treat for this lesson is going to be adding a third dimension, a Grandchild Recordset (they're breeding like rabbits), to handle our books for each class. To do this, we're basically going to nest a SHAPE statement inside our main SHAPE statement. Here's what the Grandchild Recordset setup looks like:
Notice that we've nested a second SHAPE statement inside our first APPEND statement. So we just add our third recordset, a new alias and some new key references. To add our books to our class lists, we'll use this SQL: <% Dim SQL You should notice the new SELECT statement and alias "Books". Now we just need to add a new SET statement inside our Classes Loop, and add new Grandchild DO WHILE...LOOP statements. <% DO WHILE NOT rsProfessors.EOF Check out the completed Grandchild example. The Full Course MealDon't just stop there. You can expand it to multiple grandchildren, display information programatically by writing dynamic SQL statements, and on and on. Check out our final example, also available in the full download. Thanks to Kindler Chase for pointing me toward several DataShaping resources that helped get me started. |
|||||||||||||||||||||||||||||||||||||||||||||||||||||||||||||||||||||||||||||||||||||||||||||||||||||||||||||||||||||||||||||||||||||||||||||||||||||||||||||||||||||||||||||||||||||
::This page last modified 8/13/2013 at 03:37::
 |
Copyright
© 2001-2026 DreamweaverFAQ.com All Rights Reserved. All brands, trademarks, tutorials, extensions, code, and articles are the property of their respective owners. A production of Site Drive Inc. Legal Notice | Privacy Policy | Disclaimer & Notice
|
 |
