Creating a Multiple State Navigation Bar- Page ThreeAuthor: Kim
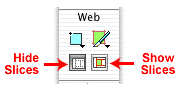
Cavanaugh Composing the Navigation BarGoing through all of those steps to create the button symbol for the navigation bar may seem like a lot of trouble, but the process of creating symbols first actually makes building a navigation bar much simpler. In the next few steps you'll finish building your navigation bar and prepare it for export. To begin composing the navigation bar, start by turning off the view of the slice overlays. This makes positioning and working with the symbols easier. Click the Hide Slices button in the Tool panel that you see here and the slice overlays will disappear. In a future step you'll need to turn the slice view back on, so take note of the location of that button as well.
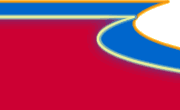
To compose the navigation bar, you need only drag additional instances of the button symbol from the Library panel onto the canvas and position the objects side-by-side. This is one of the ways that the new Property inspector can be a real time-saver. As each object comes onto the canvas use the Info area of the Property inspector to set the X and Y position of the button and to check its size. If you have set the size of the objects correctly, they should be 100 pixels wide by 40 pixels high. This makes it easy to position the buttons at 100 pixel increments for the X position. The Y position for all buttons should be set to zero. When you are finished your navigation bar should appear as you see here.
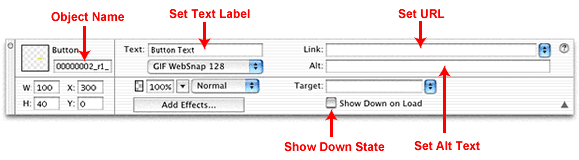
Modifying Button InstancesAnother new feature of Fireworks MX is the ability to change the instances of button symbols. Since you obviously don't want all of your buttons to have a Button Text label, you'll turn to the Property inspector to change the text for each button. Locate the Text field of the Property inspector where you need only change the text label for each button. Take a few minutes to become acquainted with the other features of the Property inspector that you see in this illustration. You'll use all of them in the next few steps.
For multiple navigation bars to be generated automatically, each button must have a particular name applied to it that matches the name of the file it is linked to. Select the slice over the leftmost button on the canvas. This button will take the viewer to the home page of this imaginary web site, so the file it will link to is called index.htm. In the link field of the Property inspector, type index.htm. Note: For multiple navigation bars, only the .htm extension may be used. In addition to naming the file, you must also name each instance of the button to match. In the case of the Home button, set the object name to index in the Property inspector, leaving off the .htm file extension. Finish this first button by changing the text in the Text field to read Home. Complete the naming of the objects in your navigation bar by selecting each button instance, moving from left to right, and setting the attributes in the Property inspector as you see in this table.
Tip: For accessibility purposes, set your alternate text while working in the Property inspector as well. Once all of your changes are applied your navigation bar should appear as you see below. You are now ready to export the navigation bar for use in Dreamweaver.
|
|||||||||||||||||||
| « Previous | 1 | 2 | 3 | 4 | Next » |
|||||||||||||||||||

::This page last modified 8/13/2013 at 04:37::
 |
Copyright
© 2001-2026 DreamweaverFAQ.com All Rights Reserved. All brands, trademarks, tutorials, extensions, code, and articles are the property of their respective owners. A production of Site Drive Inc. Legal Notice | Privacy Policy | Disclaimer & Notice
|
 |