Displaying Images From A DatabaseAuthor: Bryan
Ashcraft Displaying The Results - The Images (cont.)All but two of our images have different width / height settings so we are going to use the database to set them on an image by image basis. If all your images have the same dimensions you can simply use the "Property Inspector" to set the dimensions universally. Just remember it is always a good idea to give the browser your images' dimensions. There are several reasons for this. One of which is the fact it will allow the browser to render the page without having to wait for the image to completely download as it will know how much space to allocate for the image. To set our dimensions dynamically we need to select the lower tab in the Property Inspector.
Next we click on the + symbol which will add another item to our list. Then click the down arrow and select width from the menu.
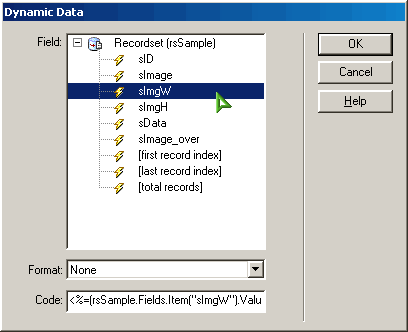
Then we need to select the lightning bolt and choose sImgW from the Dynamic Data window that will appear.
Your Property Inspector should look like this now.
Now we need to set the height for the image. We will do this by repeating the process. Click the + symbol and choose height. Click the lightning bolt and choose sImgH. When you are done with this your Property Inspector should have 3 attributes listed.
If you paid attention to the image of my database you would have noticed a field named sImage_over this field contains my mouse over image. Yes, you can even use mouse over effects with a database. Cool, huh! Anyway, in order to do this each image must have a unique name. Let say that again because it is very important. Each image MUST have a unique name for the rollovers to work. Now you might be asking yourself how can I give every image its own name when the database is placing them on the page for me. Its a lot easier than most people think. Did you notice that the name attribute was available from the same menu where we set the width and height? Its there, so we just repeat the process once more and set the name attribute to the sID field. I chose this field because it will ensure that each image has a different name since it is assigned by the database itself. The only other thing I like to do is place the word Image in front of the sID value. While it isn't necessary, it helps ensure that you don't name something else on the page the same. Once that is done you should see something like this.
As you can see the possibilities are virtually endless. You can dynamically set the image's "alt", "border", etc. from the database if you so choose. Next we will set up the rollovers, tie the data in, and set up the loop to finish our project. |
« Previous | 1 | 2 | 3 | Next » |


::This page last modified 8/13/2013 at 04:37::
 |
Copyright
© 2001-2026 DreamweaverFAQ.com All Rights Reserved. All brands, trademarks, tutorials, extensions, code, and articles are the property of their respective owners. A production of Site Drive Inc. Legal Notice | Privacy Policy | Disclaimer & Notice
|
 |