Displaying Images From A DatabaseAuthor: Bryan
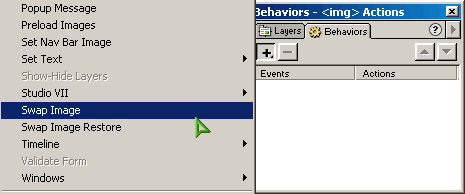
Ashcraft Displaying The Results - Swapping Images (Rollovers)Now that we have the image on the page and its attributes set, we can apply the Swap Image behavior. We begin by opening the Behaviors Panel (Window» Behaviors or SHIFT+F3). Then click the + button and select Swap Image from the list.
Select the Data Source radio button at the top (like we did when inserting the original image), and finally set it to the sImage_over field. Click ok. An error box might pop up saying the image isn't in the site's root folder. Just ignore it and click no. Then click ok. We have a little problem we need to fix. To do this we will need to get our hands dirty in the code. We need to change this: <a href="javascript:;"
onmouseover="MM_swapImage('Value)%>','','<%=(rsSample.Fields.Item("sImage_over").Value)%>',1)"
onmouseout="MM_swapImgRestore()"><img src="<%=(rsSample.Fields.Item("sImage").Value)%>"
width="<%=(rsSample.Fields.Item("sImgW").Value)%>"
height="<%=(rsSample.Fields.Item("sImgH").Value)%>"
name="Image<%=(rsSample.Fields.Item("Sid").Value)%>"
border="0"></a>
To this: <a href="javascript:;"
onmouseover="MM_swapImage('Image<%=(rsSample.Fields.Item("Sid").Value)%>','','<%=(rsSample.Fields.Item("sImage_over").Value)%>',1)"
onmouseout="MM_swapImgRestore()"><img src="<%=(rsSample.Fields.Item("sImage").Value)%>"
width="<%=(rsSample.Fields.Item("sImgW").Value)%>"
height="<%=(rsSample.Fields.Item("sImgH").Value)%>"
name="Image<%=(rsSample.Fields.Item("Sid").Value)%>"
border="0"></a>
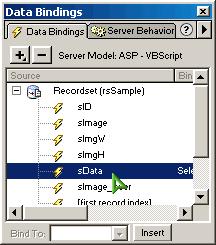
Just another one of UltraDev's little quirks. But that will have your images good to go. Now we can move on to the data that will accompany our images. Displaying The Results - The DataIn the second column of the table we want to insert the description that relates to our image so we will open the Data Bindings window (Window» Data Bindings or CTRL+F10 in Windows, CMD+F10 on a Mac). Then select sData and Drag and Drop it into the second column of our table.
Here is what our table should look like at this point.
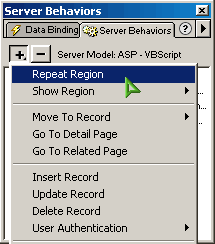
Displaying The Results - Looping Through The DatabaseIn order for all the information from our database to be displayed we need to loop through all the records. This can be accomplished using the Repeat Region server behavior. First we select the <tr> tag at the bottom left of our window. When selected the <tr> will become bold.
Next we select Repeat Region from the Server Behaviors drop down menu by clicking on the + symbol.
You can select what recordset to use and how many records to show from the new window that will appear. Now your table should be surrounded by a border with a label on the top left like so:
That's all there is to it! The Example(s)View an example of the results here. The Download(s)Download a zip file with the DB and display page here. |
« Previous | 1 | 2 | 3 |
::This page last modified 8/13/2013 at 03:37::
 |
Copyright
© 2001-2026 DreamweaverFAQ.com All Rights Reserved. All brands, trademarks, tutorials, extensions, code, and articles are the property of their respective owners. A production of Site Drive Inc. Legal Notice | Privacy Policy | Disclaimer & Notice
|
 |


