|
Q. How do I center my content without using the "Letterbox Frameset" extension? A. You can use a little hand coding along with objects
already included with Dreamweaver. Using Frames To Align Page Content - Method 2Author: Bryan
Ashcraft The Manual MethodFirst off, let me point out that the method I will use here doesn't use as many frames as the extension creates. Why? Because I want to give you an alternative method for centering when using tables to hold your content. If you plan to use layers, you will need the extra frames for the horizontal centering. After completing this tutorial you should be familiar enough with frames to add the nested frameset without problems. Therefore I will omit it here. Creating The PagesAs in the previous example, I like to create my "framed" pages first. So let's begin by doing that. border.htm- This page will contain what we want
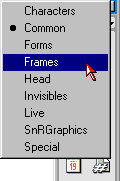
to use to surround the actual content on our site. Creating The FramesetNow that we have our border and content pages finished we are ready to create the frameset (index.htm) page. With our frameset page open, select "Frames" from the
"Object" palette's drop down. Then select the "Top Frame" object to insert the first
part of our frameset.
The Hand CodingYou may be wondering why I choose to do it this way. I simply find it easier for me. Experiment for yourself, you might be more comfortable doing it another way. I just think this is faster than trying to combine two "Frame" objects. Which, by the way, would still require some code modification by hand. Unless, of course, you don't mind using nested framesets unnecessarily. In which case simply click the "Bottom Frame" object after selecting the top one. OK, enough rambling. Let's get into the code! To get at the code DW4 provides us with a couple of ways: Our code will look something like this: <frameset rows="80,*" frameborder="NO" border="0" framespacing="0"> We need to modify it to look like this: <frameset rows="*,420,*" frameborder="NO" border="0" framespacing="0"> *Notice that we decided to save some time and went ahead and set our dimensions while adding the new frame. Our content is an image with a height of 420 pixels. This is reflected in our frameset properties. We also gave the new frame, and its source, a unique name.*
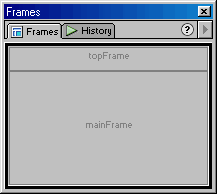
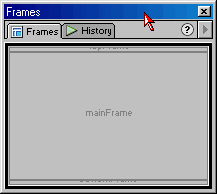
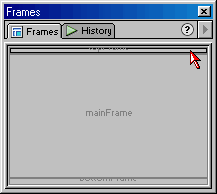
Setting The Properties Of Our FramesetAll that is left to do is tell our frameset what pages should be displayed within each of its frames. If you are comfortable enough with hand coding feel free to set each frame's source from there. For those of you who aren't we will return to the design view and select each section within the "Frames" palette, then use the "Property Inspector" to set the source for that section.
That's all there is to it! The ExampleRelated TutorialsUsing Frames To Align Page Content-
Method Two: The Manual Method Creating and Managing Framesets in Dreamweaver Available Extension(s)The following extension(s) can be found at the Macromedia Exchange by searching the word Frames. "Letterbox Frameset" by Project
VII |
||||||||||


::This page last modified 8/13/2013 at 04:37::
 |
Copyright
© 2001-2026 DreamweaverFAQ.com All Rights Reserved. All brands, trademarks, tutorials, extensions, code, and articles are the property of their respective owners. A production of Site Drive Inc. Legal Notice | Privacy Policy | Disclaimer & Notice
|
 |