Creating and Managing Framesets in DreamweaverAuthor: Trent
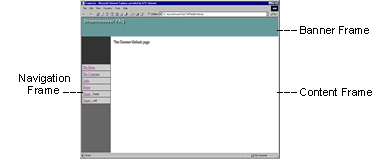
Pastrana IntroductionFramesets are popular for many reasons. One of the main reasons one uses them is because it allows you to display banner and navigation areas that never leave the viewers sight while linking through the rest of the pages. This can be an asset if your pages are heavy and take a while to load. The viewer has something to look at and is less likely to leave. In this tutorial were going to take a straightforward approach to creating and managing Framesets in Dreamweaver. We will start from scratch and create one of the most common frameset layouts. The three frame Frameset.
Creating the FramesetThe Frames Objects Palette
Here is the frameset portion of the HTML generated inside the frameset.htm: <frameset rows="90,*" cols="*" frameborder="NO" border="0" framespacing="0"> <frame name="topFrame" scrolling="NO" noresize src="banner.htm" > The Frameset Title
On a frame based site, the outer Framesets title will always be displayed for the pages title no matter what you have named each individual frame or page in the rest of the Frameset. Since this is a 3 Frame Frameset, it will consist of 4 HTML pages.
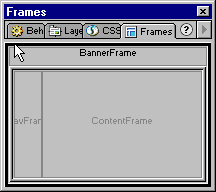
One for the frameset..and one for each of the other content areas. Naming The FramesThe Dreamweaver Frames Panel
Saving the FramesetWith our Frameset created, and all of the Frames named we can now
save everything. In the Frames Panel select the outermost border of the Frameset with your mouse. It will highlight in black as shown in the screenshot above. This the outer Frameset.
Now the Frameset and all of its frames have been saved. Here are the .htm files that were created
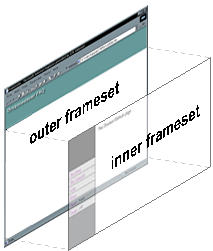
The Difference between the Frames and the .htm filesBefore we go any further I would like to explain the difference between the Frames and the .htm files that reside inside of them. Even though we have named our .htm pages similar to that of the Frames, there really is no connection to this. You can, while saving the initial frameset, name the .htm files whatever you like. The Main Frameset.htm holds all of the data for the structure of the Frameset and the Frames themselves. That's really its only purpose. The .htm files (pages) just reside inside of these Frames and can be replaced with other ones at any time. Basically, any time you go into the Frames Panel and make adjustments to any of the frames you are editing the Main Frameset.htm We are ready to make some adjustments of the layout of our new Frameset to suit our needs. A visualThis picture should help you understand a little better how the inner Frameset is nested inside of the Main (outer) Frameset. The inner Frameset sits inside of the lower row of the outer Frameset. 
|
||||
::This page last modified 8/13/2013 at 03:37::
 |
Copyright
© 2001-2026 DreamweaverFAQ.com All Rights Reserved. All brands, trademarks, tutorials, extensions, code, and articles are the property of their respective owners. A production of Site Drive Inc. Legal Notice | Privacy Policy | Disclaimer & Notice
|
 |


