Site Structure Planning and Mapping- The Procedure, Steps 1-6Author: Corey
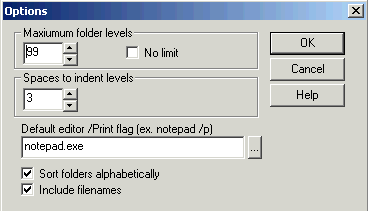
Eiges The Procedure1. Install the TreePrint utility. Once installed, it may be accessed by opening Windows Explorer and right clicking on a folder. You will see the TreePrint icon and when you put the mouse pointer over it you will see a submenu. Select "Options." Where it states "Spaces to indent levels" enter the number 3. The two checkboxes must be checked. The default editor box should show "notepad.exe /p" but you should delete the "/p" switch so that it just reads "notepad.exe".
Give It A Try!Now try using TreePrint on a site you want to map. Right click on the root folder of the site within Explorer. Mouseover TreePrint and click Print. A raw folder/file tree will appear in a temporary text file. If it does not pop up, click the Notepad box on the taskbar or use Alt-Tab to pop it up. Now you should have a nice clean raw tree. For some of you, this will be sufficient and you may print, save and stop here. If you want a more detailed and graphical sitemap, continue on to the procedure below. The StrategyThe templates have hidden and visible layers (the term "template" is used herein for its original sense; it is not a Dreamweaver template). The TreePrint utility will be used to obtain a raw alphabetized folder/file listing and sections of that output will be copied and then pasted into the appropriate visible layers. The second column of the Assets page has sections to list various items such as stylesheets, library items, etc. Each such item will have a corresponding label, i.e. a colored gif that may be found in Dreamweaver's Asset Panel. When a hidden layer is made visible, it is seen to overlay the layer containing the file list that was pasted. The gifs will first be dragged and dropped to the left of all such "assets," one gif per asset, into the overlay. Afterwards, they will be dragged and dropped into empty rows in the overlay beneath each html pagename, up to 9 labels per pagename, showing which assets are referenced by or associated with each page. Think of it using this analogy. You put your list of files on a sheet
of paper and then put a semitransparent sheet of graph paper over that
list. The graph paper is lined up so that filenames on the sheet underneath
it line up with every other row of boxes on the graph paper. The small
labels will be placed (on the graph paper) in the boxes of the empty row
under each filename. Steps 2 - 62. Create a new site in Dreamweaver and call it "SITEMAP." 3. Unzip the templates and files into the SITEMAP folder. The templates are read-only. Decide which files you will be using, the ones for portrait or landscape printing. Open them (select "View") in Dreamweaver and save them with different filenames unique to the site you will be mapping. This will give you editable working copies while preserving the originals. 4. Open your site's Assets page for editing. Open the Dreamweaver Assets Panel (Window» Assets, or press F11) and drag its bottom border so that it is much longer than usual. You will see many small gifs. These are the labels you will use to cross-reference the various files.
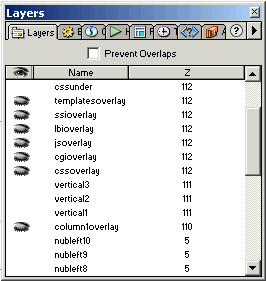
5. Now look at the Layers Panel. You will see that it has a shut-eye icon to the left of the column1overlay layer name (as well as several others).
If you click the eye it will become an open-eye Leave the column1overlay layer eye shut for now. 6. Highlight the sitename layer in the Layers Panel. Now click inside that layer on the page itself and overwrite www.YouNeedaWebstore.com to input the name of the site you want to map. |
|||||||||||||||||||||
|
« Previous | 1 | 2 | 3 | 4 | Next » |
|||||||||||||||||||||
::This page last modified 8/13/2013 at 04:37::
 |
Copyright
© 2001-2026 DreamweaverFAQ.com All Rights Reserved. All brands, trademarks, tutorials, extensions, code, and articles are the property of their respective owners. A production of Site Drive Inc. Legal Notice | Privacy Policy | Disclaimer & Notice
|
 |
