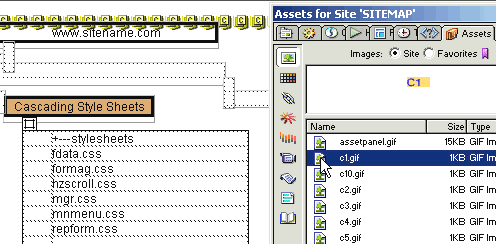
Site Structure Planning and Mapping- The Procedure, Steps 10-17Author: Corey Eiges Steps 10 - 1710. Open the Dreamweaver Assets Panel to view the selection of available CSS labels. You will see C1 through C10 as well as CH. Assign C1 through C10 to up to 10 of your stylesheets. We will reserve CH for those pages that have styles within the Head of the document. Click the C1 GIF and drag it into the left-hand cell of the second row of the table, which should put it to the left of the first stylesheet and below the name of your css directory. Here is what I mean:
Drag the other CSS labels into the corresponding left-hand cells. Special Note of Caution: You must be very careful when clicking on the page because if you are not you will wind up putting the GIFs in the wrong layer. Remember that one layer overlays the other so if you lose focus you can easily drag the GIF into the wrong layer even though it may seem to be the correct layer. 11. Repeat this procedure for the remaining Assets, i.e. CGI, JavaScript, library items, SSI and Dreamweaver templates. You simply need to switch to the appropriate layers (check their names), and use other file lists taken from the TreePrint output.
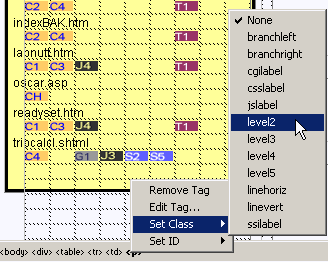
Customizing The Look12. If you don't use certain items, such as external JavaScript, and you don't want large blank areas on your sitemap printout, you may change the text within the bordered "boxes" to what you do use. You can make unused layers invisible with shut-eye icons. You can also shorten the black vertical line that connects the boxes, by changing the length of the transparent shim.gif within the vertical1 layer. In other words, if (for example) all you use are CSS and DW templates, which are the first and last boxes of this section of the "tree" then you will have a large blank unused area on this part of your sitemap. To eliminate that, you could delete the unused layers, shorten the long vertical line and move the Templates box and the nub connecting it to the vertical line higher. You may also make the other boxes invisible and leave them on the page as such. You may also relabel the JavaScript box to read "Templates" (you should also rename the layers if you do that) and make the unused layers invisible. 13. Filling the Images section is much easier. Click inside the blue "imagefiles" layer. Highlight and copy the images folder/file listing from the TreePrint output and paste it within the imagefiles layer. There will be no labeling for this section, just a directory structure and file listing so you do not need to do anything else here other than get rid of the "|" characters by replacing them with nothing. However, if you want to indent the filenames as seen in the sample map, here is how to do it. Highlight a section of the file listing including the foldername. Determine how many levels down it is nested, and then apply the appropriate css style to the <p>, such as level2 if it is nested at the second level from the root, etc. The fastest way to indent the list is to press the [Enter] key before and after a folder/filelist section so DW surrounds it with <p> and </p>. Open the code view to help you confirm the placement of the <p> tags. Next, place your cursor somewhere within the paragraph. Then right click the <p> at the far right of the Tag Selector, choose "Set Class" and select which style you want to apply.
Use the code view to help you see where to delete extraneous occurrences of <br>. You may also use this technique to indent nested folders and pages listed in other sections of the sitemap. 14. Now you must assign labels to the files at the root of the website you are mapping. The column1overlay layer should now have an open-eye making it visible. Click the leftmost cell of the empty row below the first page's filename. Open and examine that page itself and ascertain which assets are referenced by it or associated with it. Is that page based on a Dreamweaver template? If so, which one? The assets section should list all of your site's DW templates and have them labeled T1 through T10. Does this page have styles declared in the Head? If so, you would label this page with the CH gif. Does this page have a linked stylesheet especially for Netscape and use the @import trick for Internet Explorer? If so, you need to determine which are the 2 associated labeled CSS files in the assets section of the sitemap. Once you have figured out which assets are referenced by or associated with this particular page, all you have to do is drag and drop the appropriate gif from the DW Assets panel to an empty cell below the filename. Repeat this procedure for each of your pages. Does this seem like a lot of work? Of course it is! But that is primarily because you are doing this after the fact, and not while you are creating the pages. If you follow this sitemap procedure as you create your site, or if you use it as a blank site plan to help you create the site structure before anything else, you will find that it goes much more quickly (See step 16). Please Note: The time you spend labeling your pages with its associated assets can save you a great deal of time at other stages later on, e.g. when you need to edit the site. 15. The remaining sections of the sitemap must be done in a fashion similar to how you dealt with the rootfiles. The primary difference is that you will include the folder names in addition to the filenames (because you are going deeper than the root level). Copy and paste folder/file lists, and drag and drop GIFs into the appropriate cells. If you have nested folders, you will find occurrences of "||" in addition to single instances. In that case, enter || for the Search For string and replace it with <Br>. Afterwards, search for the single | character and replace with nothing. That will clean up your tree. The "boxes" on the Pages template are not labeled. You may of course label them if you wish.
16. Your workflow will be smoother if you use the included Word 2000 document, "Sitemap Structure Reference Tables.doc" to keep track of your site's assets as you build the site. It will be a simple matter of looking at the record you make and dragging and dropping the GIFs according to that sheet. 17. Printing the sitemap is done by previewing the page in IE5 and printing from there. It is recommended to use the Print Preview function first, as you may need to tweak the margins to suit your particular printer. You should use a color printer if at all possible. |
|
« Previous | 1 | 2 | 3 | 4 |

::This page last modified 8/13/2013 at 04:37::
 |
Copyright
© 2001-2026 DreamweaverFAQ.com All Rights Reserved. All brands, trademarks, tutorials, extensions, code, and articles are the property of their respective owners. A production of Site Drive Inc. Legal Notice | Privacy Policy | Disclaimer & Notice
|
 |
